The integration of any payment gateway with the single page application (SPA) is not an easy task. If you are working on it, there are some challenges you have to face. Working with the third party core JavaScript which works on API key is another core challenge for you.
In this article, we will discuss functional and useful steps to integrating Affirm payment gateway with your SPA. This can be a helpful guide to do the procedure without much time and hurdles. But, before we move ahead, we must know about Affirm? Affirm is a payment gateway API, which allows users to pay their bills or subscription charges based on monthly installments.
Pre-requisites
Before the start of integration Affirm.js in your system you must review the following things :
- js transaction flow when purchase with Affirm
- Affirm API documentation
- A complete end-to-end Affirm.js transaction
Sandbox development
- You have to retrieve Affirm sandbox API keys for develop and test Affirm integration in your application and you can get API keys from here https://sandbox.affirm.com/dashboard/#/apikeys
- Once you complete your development you have to use live API keys which you can get from here https://affirm.com/dashboard/#/apikeys
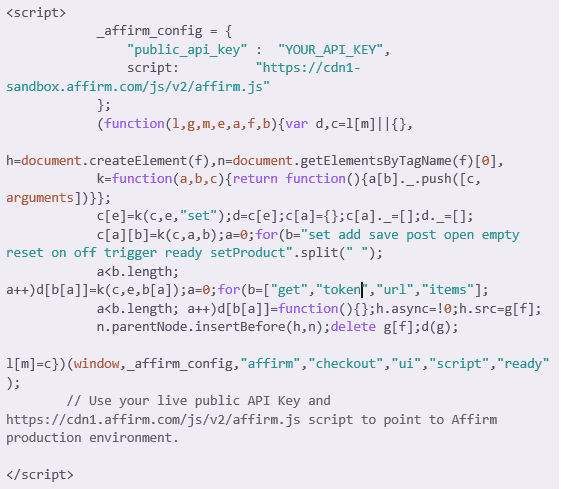
Step 1: Add Affirm.js
In this step you have to add Affirm.js embed code to the head of your global page of application but in our case we are working with SPA so we have to add Affirm.js embed code to head part of index.html file.

Your index.html is only file where you need this embed code.
[Recommended Reading: 10 Ways You Can Enhance The Performance Of Your Angular App ]
Step 2: Initiate a checkout
Once you add Affirm.js code in your application you will use following commands
- checkout({ }) for creates and stores the Affirm checkout object
- checkout.open() for sends the checkout object to our Affirm Checkout API
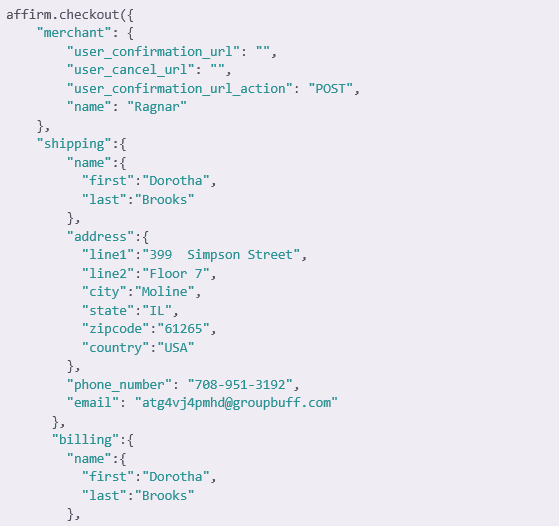
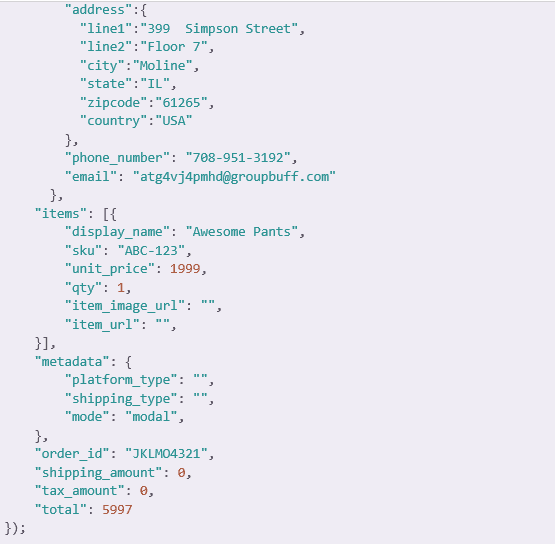
Create a checkout object
The Affirm checkout object have all the information about the order. You have to create the checkout object using affirm.checkout({ }).


Send the checkout object
Once you create the checkout object then call affirm.checkout.open({});
Inside affirm.checkout.open({}) we have defined two callback functions as follow

This does the following:
1. Send checkout object to Affirm checkout API
2. Redirects the customer to the Affirm checkout process and shows them an Affirm modal
3. Validates affirm checkout object data
Error handling
A pop-up window will display any errors generated by the checkout process.
Following are reasons where affirm give error
- Invalid phone number
- Invalid address
You can define a callback function. In this callback function you will handle error.

Step 3: Authorize the charge
Once you finished affirm checkout process, now you have to authorize the charge
Receive the checkout token
Follow these steps to receive the checkout token:
1. Initiate checkout to access the Affirm account creation screen
2. If you have an existing account, click Sign In
3. If you don’t have an existing account, create one with the following:
- Any first and last name
- An email address with a valid format
- A valid US cell phone number (you do not need access to this number) that you will use in all subsequent checkout attempts
- A birth date older than 18 years old
- Any four digits
4. Enter 1234 for the verification code and click VERIFY CODE
5. Complete checkout flow and click CONFIRM LOAN
Once we complete these steps than affirm will redirect us to our application and in our on onSuccess callback function we will receive checkout token.
Authorize the charge
After completing checkout flow and click confirm loan user will redirect to their application and in onSuccess callback function we have checkout token.
Now for affirm authorized charge we have to send this checkout token and order id to affirm.A transaction is not visible in the Read response, nor in the merchant dashboard until you authorize it.
For authorized charge we have to send following request to affirm.

URL
Options
- Type: POST
- Authorization: Basic
- Content type: application/JSON
- Data: JSON string
Authorization
In Http request you have to convert your publict_key and private key pair to base64 and then send in request header. Followings are examples.

Data
- checkout_token : Unique token which we will receive after authorized charge
- order_id :Unique order_id for identify merchant order.
Error handling
- Authorization failed (400)
- Unauthorized (401)
- Checkout_token expired (401)
Step 4: Capture the charge
Once you authorized charge from affirm now for merchant you have to capture charge. For capture charge merchant have two options
1. Capture charge from your affirm dashboard
2. Make http request to affirm
If you go with the second option then you have to make the following request to affirm.

URL
- Sandbox:https://sandbox.affirm.com/api/v2/charges/<transaction_id>/capture
- Live: https://api.affirm.com/api/v2/charges/<transaction_id>/capture
Options
- Type: POST
- Parameter: Id field which we will receive from response after call authorized charge API
- Authorization: Basic
- Content type: application/JSON
- Data: JSON string
Authorization
In Http request you have to convert your publict_key and private key pair to base64 and then send in request header. Followings are examples.

Data
- order_id :Unique order_id for identify merchant order.
Note
In Angular Application might you have faced one problem like sometime affirm load earlier than your application so you have to again call affirm.ui.refresh(); in your particular route html file like follow

Conclusion
We hope this guide is ample to supplement your knowledge with the right technicalities and skills. We at Bytes Technolab use high-end technology stack including Angular and Mean Stack Development to build Affirm Payment gateway for ecommerce websites.
We are also determined to using innovative and high quality technology to drive the right business results for our customers. For any ecommerce design and development solutions, you can feel free to connect with us.