Web Development

Introduction

TypeORM is a popular Object-Relational Mapping (ORM) library for TypeScript and JavaScript that allows web developers to work with databases using object-oriented programming. It simplifies the communication between the application and the database by abstracting the database interactions and representing them in a more developer-friendly manner.

Nest.js is a progressive Node.js framework for building scalable and efficient server-side applications. It provides a powerful foundation for building server-side applications using TypeScript, and it seamlessly integrates with various libraries and tools, including TypeORM.

Migrations in TypeORM

Migrations are a crucial part of managing the database schema and structure when using TypeORM in Nest.js or any other project. In a real-world application, as the project evolves, the database schema might need to change to accommodate new features, bug fixes, or updates. Migrations enable you to handle these changes safely and efficiently.

Here's why migrations are needed

Version Control

Migrations help you version control the database schema alongside your application’s code. Each migration represents a single step in the evolution of the database schema, making it easier to manage changes in a team environment.

Safety and Consistency

With migrations, you can apply changes to the database in a controlled manner. This ensures that the database remains consistent and avoids unexpected data loss or corruption.

Collaboration

When working in a team, migrations enable each developer to modify the database schema independently. These changes can then be applied by others seamlessly using the migration scripts.

Rollback Capability

Migrations allow you to roll back changes to the previous state if required. This can be beneficial in case of errors or when a feature is rolled back from the application code.

In Nest.js, using TypeORM with migrations involves the following steps:

Set Up TypeORM

First, you need to set up TypeORM in your Nest.js project by installing the necessary dependencies and configuring the database connection.

Creating Entities

Entities in TypeORM represent database tables. Define the entities in your application that will correspond to the database tables.

Generating Migrations

When you make changes to the entities or database schema, you can generate migrations using the TypeORM CLI or programmatically through the TypeORM API. Migrations will be created based on the changes detected in the entities.

Applying Migrations

Once you have generated the migrations, you can apply them to the database using the TypeORM CLI or programmatically through the TypeORM API. This process alters the database schema according to the changes specified in the migration.

Rollback

If needed, you can also roll back migrations using the TypeORM CLI or API, which reverts the changes made by the specific migration.

Hire expert developers for TypeORM

What are migrations and why do we use it?

NestJS

What are these migrations?

Migrations are the database query that will structure the DB for our project.

To start storing data first we need to lay out the schemas for the database to store our data in, that’s where the migration comes into the picture, we can identify the tables or collections to store our data with relations.

Why do the developers use migrations?

There are some benefits to using migration, it maintains the record of the migrations which are run into the database, so it will only run once and it’s easier to align our schemas with the database.

Example

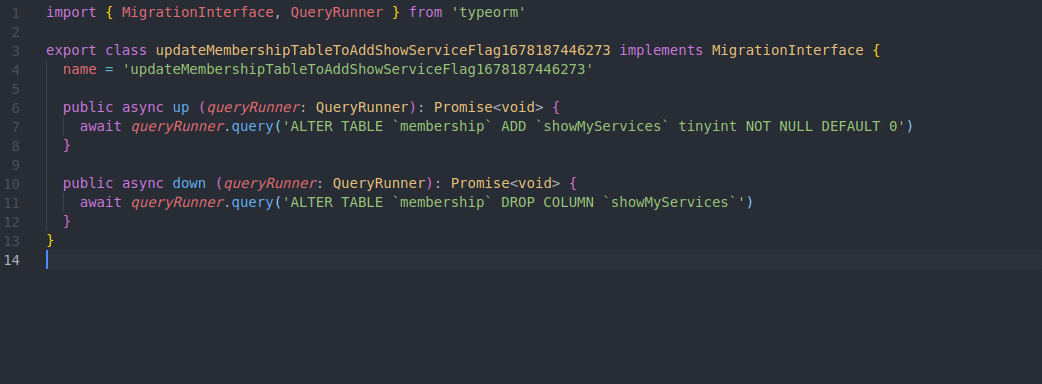
Here is a small example it’s altering the membership table column and adding the new column “showMyService”

Note: Add a timestamp before the migration name as it’s easier to track which migration runs first.

Migrations


How to set up TypeORM in Nest.js?

1. Go to your project repository (Nest.js) and run the command.

npm install mysql –save

npm install TypeORM –save

This installation will install mysql and TypeORM in your project, you can install any other db to use with TypeORM.

2. Create a data source config file and store all the config for the database there.

const datasource = new DataSource({
type: ‘mysql’,
host: “localhost”,
port: 3306,
username: “root”,

password: “xyz123”,
database: “relief_arc_dev”,
entities: [‘dist/**/*.entity{ .ts,.js}’],
migrations: [‘dist/src/migration/*{.ts,.js}’],
migrationsTableName: ‘migrations_TypeORM’,
});

3. Create a new file in the source folder named mysql.config.ts which will contain the code shown below:

export const TypeORMConfig: TypeORMModuleOptions = {
type: ‘mysql’,
host: process.env.DB_HOST,
port: parseInt(process?.env?.DB_PORT ?? ‘3306’),
username: process.env.DB_USER,
password: process.env.DB_PASSWORD,
database: process.env.DB_DATABASE,
entities: [‘dist/**/*.entity{ .ts,.js}’],
migrations: [‘dist/src/migration/*{.ts,.js}’],
migrationsRun: true,
migrationsTableName: ‘migrations_TypeORM’,
synchronize: false,
logging: true
}

This is the default config file that we can feed to TypeORM

There are two keywords we need to keep in mind

a. MigrationsRun

• This key lets TypeORM know whether we need to run migration or not when we start the project so when we create migration we need to keep this key as true.

b. Synchronize

• This key is for the entity in the Nest.js. If we keep it as true it will create the db schema according to our entity files defined in the project so keep this key as false we want to manage our schema from the migrations that way we can manage the information of what is already in the db.

4. Then add the below script into the package JSON file.

“migration:generate”: “npx TypeORM-ts-node-esm migration:generate -d ./datasource.config.ts”,
“migration:run”: “npx TypeORM-ts-node-esm migration:run -d ./datasource.config.ts”,

5. Now you can run the command.

• To generate migration of database changes, you need to run the below command after making changes on any entity.ts file.
npm run migration:generate src/migration/{migration-file-name}

• To create an empty migration for a SQL query you need to create an empty migration and for that you need to run the below command.
npm run migration:create src/migration/{migration-file-name}

6. To run the migrations

npm run migration:run

This will check the migration already run in the database and will only run the new migrations

7. This same process can be followed for PostgreSQL, CockroachDB, SQLite

Hire Experts

Contact the Best TypeScript & JavaScript Developers

Bytes Technolab boasts a world-class team of TypeScript and JavaScript developers with diverse skills and experience to have worked with various industry-based software application development.

Whether it is a custom backend development or extending the software capabilities with meaningful integration with third-parties, our full-stack JavaScript development team will deliver end-to-end services. Be it queries related to TypeORM or Nest.js, we will be happy to give the right recommendations.

Hire a remote team and accelerate your in-house software application development journey with an extended team.

Related Blogs

Selecting the Best Adobe Experience Manager Solution for Your Needs

Selecting the Best Adobe Experience Manager Solution for Your Needs

Creating and managing engaging content across various platforms is important for eCommerce stores in this ever-evolving digital commerce era. Th...

How Adobe Commerce Development Partner Boosts Your eCommerce Success?

How Adobe Commerce Development Partner Boosts Your eCommerce Success?

Modern retail owners have turned to accredited eCommerce development companies as their technical consulting and implementation partners. By han...

What Are the Top Security Threats to Adobe Commerce Stores?

What Are the Top Security Threats to Adobe Commerce Stores?

Most businesses are looking to expand their presence in the online marketplace and that’s led to the growth of eCommerce platforms like Adobe ...